Extracting text from an image can be exhausting, especially when you have a lot to extract. One commonly known text extraction library is PyTesseract, an optical character recognition (OCR). This library will provide you text given an image.
PyTesseract is really helpful, the first time I knew PyTesseract, I directly used it to detect some a short text and the result is satisfying. Then, I used it to detect text from a table but the algorithm failed perform.
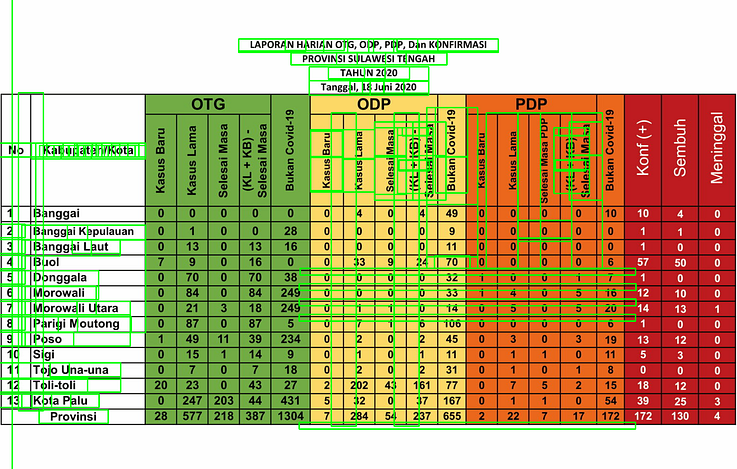
Figure 1 depicts the text detection result, with green boxes enclosing the detected words. You may realized that most of the text can’t be detected by the algorithm, especially numbers. In my case, these numbers are the essentials of the data, giving me value of daily COVID-19 cases from a local government in my hometown. So, how extract these information?
Getting Started
When writing an algorithm, I always try to think as if I’m teaching the algorithm the way humans do. This way, I can easily put the idea into more detailed algorithms.
When you’re reading a table, the first thing you might notice is the cells. A cell might be separated from another cell using a border (lines), which can be vertical or horizontal. After you identify the cell, you proceed to read the information within. Converting it into algorithm, you may divide the process into three processes, namely cells detection, region of interest (ROI) selection, and text extraction.
Before going to each task, let’s load the image as shown below
import cv2 as cv
import numpy as npfilename = 'filename.png'img = cv.imread(cv.samples.findFile(filename))
cImage = np.copy(img) #image to draw linescv.imshow("image", img) #name the window as "image"
cv.waitKey(0)
cv.destroyWindow("image") #close the window
Want to skip the article and see the full code?
Here it is the code: Text-Extraction-Table-Image
Cells Detection
Finding horizontal and vertical lines within a table might be the easiest to start with. There are many ways of detecting lines, but one interesting method for me is by using Hough Line Transform, an OpenCV library. For mode detail, please visit this link.
Before applying the Hough Line Transform, there are multiple pre-processings to do. The first one is to convert your image into a gray scale image, in case you have an RGB image. This gray scale image is important for the next step, Canny Edge-Detection.
gray = cv.cvtColor(img, cv.COLOR_BGR2GRAY)
cv.imshow("gray", gray)
cv.waitKey(0)
cv.destroyWindow("gray")canny = cv.Canny(gray, 50, 150)
cv.imshow("canny", canny)
cv.waitKey(0)
cv.destroyWindow("canny")
The left figure below shows the grayscale image, while the one on the right shows the Canny image.


Hough Line Transform
In OpenCV, there are two types of this algorithm, namely standard Hough Line Transform and probabilistic Hough Line Transform. The standard one will give you the line equation, so you do not know the beginning and end of the line. While the probabilistic line transform will give you the list of lines, in which a line is a list of the beginning and end coordinate. For my purpose, the probabilistic one is more preferable.


For the HoughLinesP function, there are several input arguments:
- image — 8-bit, single-channel binary source image. The image may be modified by the function.
- rho — Distance resolution of the accumulator in pixels.
- theta — Angle resolution of the accumulator in radians.
- threshold — Accumulator threshold parameter. Only those lines are returned that get enough votes
- line — Output vector of lines. Here is set to None, the value is saved to linesP
- minLineLength — Minimum line length. Line segments shorter than that are rejected.
- maxLineGap — Maximum allowed gap between points on the same line to link them.
# cv.HoughLinesP(image, rho, theta, threshold[, lines[, minLineLength[, maxLineGap]]]) → linesrho = 1
theta = np.pi/180
threshold = 50
minLinLength = 350
maxLineGap = 6linesP = cv.HoughLinesP(canny, rho , theta, threshold, None, minLinLength, maxLineGap)
To differentiate between a horizontal and vertical line, I defined a function and add list based on the function return value
def is_vertical(line):
    return line[0]==line[2]def is_horizontal(line):
    return line[1]==line[3]horizontal_lines = []
vertical_lines = []

if linesP is not None:
    for i in range(0, len(linesP)):
        l = linesP[i][0]        if (is_vertical(l)):
            vertical_lines.append(l)

        elif (is_horizontal(l)):
            horizontal_lines.append(l)for i, line in enumerate(horizontal_lines):
    cv.line(cImage, (line[0], line[1]), (line[2], line[3]), (0,255,0), 3, cv.LINE_AA)

for i, line in enumerate(vertical_lines):
    cv.line(cImage, (line[0], line[1]), (line[2], line[3]), (0,0,255), 3, cv.LINE_AA)

cv.imshow("with_line", cImage)
cv.waitKey(0)
cv.destroyWindow("with_line") #close the window

Overlap Filter
The detected line is as shown in the figure above. However, there are some overlapping lines in the Hough Line Transform result. The thicker lines consist of more than a line in the same position, different in length. To eliminate this overlapping line, I define an overlapping filter.
Initially, the lines are sorted based on a sorting index, the y₁ for horizontal lines and x₁ for the vertical lines. If the following line is separated less than a certain distance, then we consider it as the same line as the previous one. This might be a bit like “dirty work”, but it works.
def overlapping_filter(lines, sorting_index):
    filtered_lines = []

    lines = sorted(lines, key=lambda lines: lines[sorting_index])
    separation = 5    for i in range(len(lines)):
            l_curr = lines[i]
            if(i>0):
                l_prev = lines[i-1]
                if ( (l_curr[sorting_index] - l_prev[sorting_index]) > separation):
                    filtered_lines.append(l_curr)
            else:
                filtered_lines.append(l_curr)

    return filtered_lines
Implementing the overlapping filter and adding text on the image, now the code should look like this:
horizontal_lines = []
vertical_lines = []

if linesP is not None:
    for i in range(0, len(linesP)):
        l = linesP[i][0]        if (is_vertical(l)):
            vertical_lines.append(l)

        elif (is_horizontal(l)):
            horizontal_lines.append(l)    horizontal_lines = overlapping_filter(horizontal_lines, 1)
    vertical_lines = overlapping_filter(vertical_lines, 0)for i, line in enumerate(horizontal_lines):
    cv.line(cImage, (line[0], line[1]), (line[2], line[3]), (0,255,0), 3, cv.LINE_AA)
    cv.putText(cImage, str(i) + "h", (line[0] + 5, line[1]), cv.FONT_HERSHEY_SIMPLEX, 0.5, (0, 0, 0), 1, cv.LINE_AA)                      for i, line in enumerate(vertical_lines):
    cv.line(cImage, (line[0], line[1]), (line[2], line[3]), (0,0,255), 3, cv.LINE_AA)
    cv.putText(cImage, str(i) + "v", (line[0], line[1] + 5), cv.FONT_HERSHEY_SIMPLEX, 0.5, (0, 0, 0), 1, cv.LINE_AA)
cv.imshow("with_line", cImage)
cv.waitKey(0)
cv.destroyWindow("with_line") #close the window

With this refined code, you won’t have an overlapping line. Also, you will have the index of your horizontal and vertical lines written in the image. This index will be useful for the next task, ROI selection
ROI Selection
First of all, we need to define the number of columns and rows. In my case, I’m only interested in data from row two fourteen, and all the columns. For the columns, I defined a list named keywords to use it for the dictionary keyword.
## set keywords
keywords = ['no', 'kabupaten', 'kb_otg', 'kl_otg', 'sm_otg', 'ks_otg', 'not_cvd_otg',
            'kb_odp', 'kl_odp', 'sm_odp', 'ks_odp', 'not_cvd_odp', 'death_odp',
            'kb_pdp', 'kl_pdp', 'sm_pdp', 'ks_pdp', 'not_cvd_pdp', 'death_pdp',
            'positif', 'sembuh', 'meninggal']

dict_kabupaten = {}
    for keyword in keywords:
        dict_kabupaten[keyword] = []

## set counter for image indexing
counter = 0

## set line index
first_line_index = 1
last_line_index = 14
Then, to select the ROI, I define a function which take the image, both horizontal and vertical lines as input, as well as the line index as the border. This function returns the cropped image, and its position and size in global coordinate of the image
def get_cropped_image(image, x, y, w, h):
    cropped_image = image[ y:y+h , x:x+w ]
    return cropped_imagedef get_ROI(image, horizontal, vertical, left_line_index, right_line_index, top_line_index, bottom_line_index, offset=4):
    x1 = vertical[left_line_index][2] + offset
    y1 = horizontal[top_line_index][3] + offset
    x2 = vertical[right_line_index][2] - offset
    y2 = horizontal[bottom_line_index][3] - offset

    w = x2 - x1
    h = y2 - y1

    cropped_image = get_cropped_image(image, x1, y1, w, h)

    return cropped_image, (x1, y1, w, h)
The cropped image will be used in the next task, text extraction. The second returned argument will be used to draw the bounding box of the ROI
Text Extraction
Now, we have a the ROI function defined. We can proceed to extracting the result. We can read all the data in the column by iterating through the cells. The number of columns is given by the length of keywords, while the number of rows is defined.
First, let’s define a function to draw the text and surrounding box and another function to extract the text.
import pytesseract
pytesseract.pytesseract.tesseract_cmd = r'C:\Program Files (x86)\Tesseract-OCR\tesseract.exe'def draw_text(src, x, y, w, h, text):
    cFrame = np.copy(src)
    cv.rectangle(cFrame, (x, y), (x+w, y+h), (255, 0, 0), 2)
    cv.putText(cFrame, "text: " + text, (50, 50), cv.FONT_HERSHEY_SIMPLEX, 2, (0, 0, 0), 5, cv.LINE_AA)

    return cFramedef detect(cropped_frame, is_number = False):
    if (is_number):
        text = pytesseract.image_to_string(cropped_frame,
                                           config ='-c tessedit_char_whitelist=0123456789 --psm 10 --oem 2')
    else:
        text = pytesseract.image_to_string(cropped_frame, config='--psm 10')

    return text
Convert the image to black and white for a better result and let’s start iterating!
counter = 0print("Start detecting text...")
(thresh, bw) = cv.threshold(gray, 100, 255, cv.THRESH_BINARY)for i in range(first_line_index, last_line_index):
    for j, keyword in enumerate(keywords):
        counter += 1

        left_line_index = j
        right_line_index = j+1
        top_line_index = i
        bottom_line_index = i+1

        cropped_image, (x,y,w,h) = get_ROI(bw, horizontal, vertical, left_line_index, right_line_index, top_line_index, bottom_line_index)

        if (keywords[j]=='kabupaten'):
           text = detect(cropped_image)
           dict_kabupaten[keyword].append(text)

        else:
            text = detect(cropped_image, is_number=True)
            dict_kabupaten[keyword].append(text)        image_with_text = draw_text(img, x, y, w, h, text)
Troubleshoot
Here’s the result of the text extraction! I selected only the last three columns because it gives a strange result for some text, the rests are fine so I don’t show it.

You might realize that some numbers are detected as a random text, 5 out of 39 data. This is due to the last three columns is different from the rest. The background is black while the text is in white. Somehow it affects the performance of the text extraction.

To cope with this problem, let’s invert the last three columns.
def invert_area(image, x, y, w, h, display=False):
    ones = np.copy(image)
    ones = 1

    image[ y:y+h , x:x+w ] = ones*255 - image[ y:y+h , x:x+w ]

    if (display):
        cv.imshow("inverted", image)
        cv.waitKey(0)
        cv.destroyAllWindows()
    return imageleft_line_index = 17
right_line_index = 20
top_line_index = 0
bottom_line_index = -1

cropped_image, (x, y, w, h) = get_ROI(img, horizontal, vertical, left_line_index, right_line_index, top_line_index, bottom_line_index)gray = get_grayscale(img)
bw = get_binary(gray)
bw = invert_area(bw, x, y, w, h, display=True)
The result is shown below.

Voilà! The Result
After inverting the image, redo the step, here’s the final result!


After your algorithm can detect the text successfully, now you can save it into Python object such as Dictionary or List. Some regions name (in the “Kabupaten/Kota” are failed to be detected precisely, since it is not included in Tesseract training data. However, it shouldn’t be a problem as the regions’ indexes can be detected precisely. Also, this text extraction might fail to detect the text in other fonts, depending on the font used. In case of misinterpretation, such as “5” is detected as “8”, you can do an image processing such as eroding and dilating.
My code is far from perfect, if you find some error or chances of refinement, write me a comment!
This work is part of my volunteering work on SultengLawanCovid (Sulteng Versus Covid), an Instagram account actively informing locals about COVID-19 situation in Central Sulawesi Province, Indonesia. I am responsible for daily statistics information as well as data interpretation and visualization. Please visit the Instagram here.
It has been a fun short journey. I’m excited to finish my first initiative on an image processing project! Looking forward to the next project 😀

Assalamualaikum fazlur.
Very good explaination on Text Extraction from a Table Image, using PyTesseract and OpenCV.
I try to run but I can’t… I mean i not geeting the results like yours
LikeLike
Waalaikumsalam Anita. Could you elaborate what is the error you’re getting?
LikeLike
def main(display = False, print_text = False, write = False):
filename = ‘../images/source7.png’
#where can i get this source7.png file?
LikeLike
Sorry for the inconvenience, please change it to ‘../images/source.png’, the image file name was not modified. Otherwise, you can replace it with any image you wish to inspect.
LikeLike
Thanks a lot , Rahman. I followed your guidance and tested on my Burmese language table. Suprise thing – my work is also for COVID-19 data from Myanmar Government. I’ll push Burmese version code to your repo and I’ll also try to write a tutorial(like you) on my blog. Thanks again!!!!!!!!!! ^_^
LikeLike
Hi Rahamn, thanks for the explanation. I’ve been trying to run your code but its taking 30+ minutes. How long should it run for?
Thanks,
Oscar
LikeLike
Hi Oscar, depending on the number of lines, but it should be in order of seconds.
LikeLike
Hi Oscar, I think you should close the image window that has opened through cv.imshow(), so that way you will get the next window open and close it to and it will run until the end.
Thanks
LikeLike
Hello, how to do in the case of keyboard and is it possible to apply this method.
Thank you in advance.
LikeLike
Could you elaborate what you mean by keyboard?
LikeLike